- Introduction
- Getting Started
- Using Basic Features
- Using Advanced Features
- Specifications
Introduction
System Theory
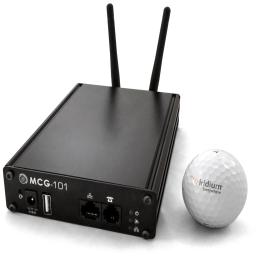
The MCG-101 was designed to provide the most powerful and versatile Iridium communications system to offices, remote locations, aircraft, and maritime. The system provides an intelligent solution for Iridium satellite phones to operate as a telephone, Internet gateway, intelligent GPS device, send/receive SMS, and attach to other devices through RS232 and ethernet.
The MCG-101 was designed using 100% digital technology. This enables the system to provide clear, true to life audio, and eliminates any internal echo problems. For external interface portions of the system, such an analog POTS telephone, echo cancellation is performed by a hardware echo canceler.
Overall, the MCG-101 is the ultimate Iridium telecommunications system available to fulfill the needs and demands of today’s business, marine, and military needs.
Click image to see full size
Equipment Overview
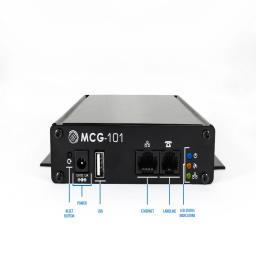
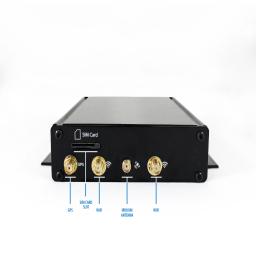
The MCG-101 is a wall mounted satellite terminal that contains Iridium technology. The terminal contains an internal SIM card that must be installed. The MCG-101 also has an exposed connector for attaching the required external antenna. The status of the entire system can be monitored through an attached computer.
Click images to see full size
Features
Telephone/POTS line
Attach any standard 2-wire telephone or PBX and you can make and receive calls over Iridium.
Ethernet port
Attach to any computer and you can connect to the Internet, set up your MCG-101 PBX and call routing features, and monitor the status of your MCG-101.
Monitoring
The system health can be monitored locally by any computer attached to the local network, or remotely by a system administrator or technician.
GPS
An optional GPS receiver can track your location and send position reports via SMS or SBD when your MCG-101 is idle.
LED Status Indicators
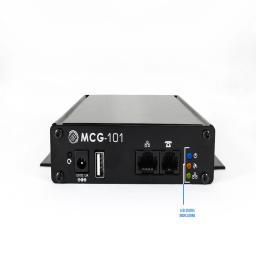
Click image to see full size
| Status of LED | Power LED | Signal LED | Ethernet LED |
| Off | No Power | No signal but registered | Disconnected |
| Solid | On | Idle with >20% signal | Connected |
| Slow Flash | Data or voice call in progress | ||
| Fast Flash | Unit is booting | Registration of SIM error or no signal to allow registration | Network Traffic |
Getting Started
System Initialization
The entire system will require three (3) minutes to initialize. The system is ready for operation when the front panel of the MCG-101 displays green lights. (see LED behavior charts)
Antenna Setup

Vehicle Mounting
When mounting the antenna on a vehicle, make sure there is no large obstruction blocking its view of the sky.
Ship Mounting
The antenna can be installed in many different locations on board. Make sure that the antenna has a clear view of the sky and there is no large obstruction blocking its view of the sky.
The antenna must not be on the same plane as the radar equipment. It is best to keep it away from radar and other RF interference for best performance.
Building Mounting
When mounting the antenna on a building, make sure that there is no obstruction blocking its view of the sky.
SIM Card Setup
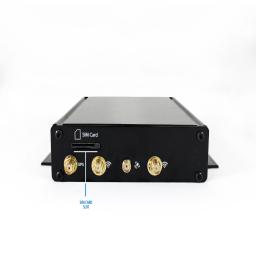
If you purchased airtime or a SIM card for your MCG-101 unit, your satellite provider will most likely have already inserted the SIM card into the unit for you. Most providers ship SIM cards unactivated, however, so you will have to request activation of your SIM card in order to begin testing and using your system. MCG-101 can use both prepaid, postpaid and crew SIM cards.
Once you are ready to begin using your unit, call or email your satellite dealer to request airtime activation. Generally, activation takes a few hours, but it can take up to 48 hours to cycle through the Iridium system. Once your airtime is activated your validity period for prepaid airtime will start. If you have postpaid airtime, your contract start date will begin with the activation date.
If you did not purchase airtime or a SIM card at the time you purchased the MCG-101, you will need to choose airtime and receive a SIM card. Please follow instructions under “Insert or Switch out SIM Card” to insert the SIM card into the MCG-101 unit yourself.
Power Setup
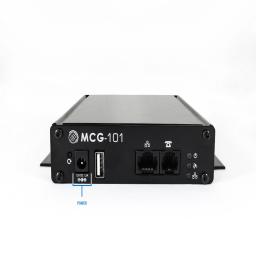
DC Input Voltage
12V @ 1.5A DC - Center Positive
Power Requirements
8W or 27 BTU per hour
Using Basic Features
Phone Calls
How to place a call:
International: Dial 011 (country code) (phone number)
US: Dial 001 (phone number)
Iridium: Dial 8816 (phone number) or 008816 (phone number)
How to receive a call:
Dial the phone number of the Iridium SIM card installed in your MCG-101.
Contact your Service Provider if you need assistance with your SIM cards.
Connecting Phones
Analog Port
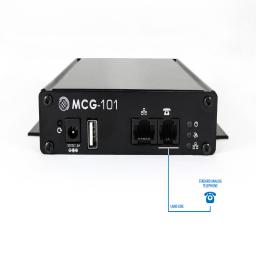
You can connect a standard analog telephone to the MCG-101 to make and receive calls, or dial other extensions. The built in IP PBX manages the call routing and features which can be customized via the web management console.
Adding Additional Phones (Extra)
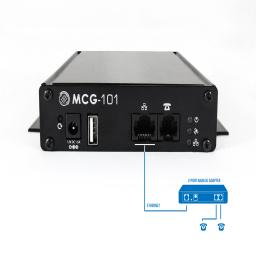
MCG-101 will also work with one or two analog phones by using an MCG101 analog phone adapter (sold separately).
2-Port Analog Adapter
This adapter provides an interface between the MCG-101 unit and two analog telephones to allow you to set up a PBX system with multiple analog telephones. This adapter is powered by a 5V adapter. This adapter is sold separately. Please contact your satellite dealer for more information.
Both analog adapters can work in conjunction with smartphone use. Care needs to be taken, however, in assigning the appropriate extensions to each device so that they don’t conflict.
Android, iOS, and PBX Software
The MCG-101 can run voice calls made on your smartphone through the Iridium network as regular Iridium satellite phone calls. In order to enable this feature you must download the free XGate Phone App. You may download it here:
Note: While it is recommended to use the XGate Phone app, any SIP VoIP soft-phone client software can be used with the MCG-101.
All settings are automatically put in for you. It is not necessary to make any changes. To make a call the MCG-101 must be powered ON and you must be connected to the wireless network.
XGate Satellite Phone App will allow you to make phone calls through the MCG-101 using your smartphone. You will be able to access all your contacts just as you would normally be able to do. The MCG-101 comes pre-programmed with four SIP voice extensions. By default, these extensions are 201 through 204. The SIP password for all 4 extensions is 1234.
201 is defined as the captain line and is the only line that can receive calls. The XGate Phone app comes configured for use with extension 201. If more than one user is expected to use the system then each user should be assigned a different extension.
Extension, passwords, and ring groups can be defined in the MCG-101’s web admin UI under Services > PBX. If using an Analog phone adapter with MCG-101 (sold separately), the phone adapter will assign line 1 (the Captain line) to extension 201 and line 2 (if using a dual phone adapter) to extension 202.
Users using the XGate Phone app in addition to analog adapters need to change the settings in XGate Phone or other SIP client to change the SIP extensions to something other than 201 and 202 (since those two extensions will automatically be assigned to the analog adapters and will cause conflicts if the SIP clients try to use those same extensions).
WiFi Setup
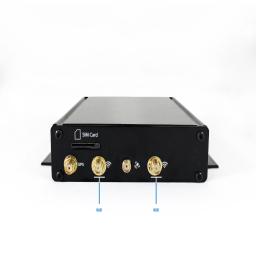
Use your computer or device to connect via wifi.
Login Information
Reset
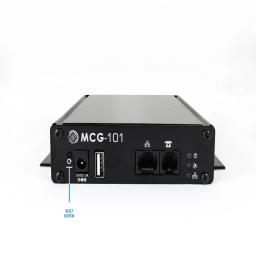
Reset Types
Using Advanced Features
Tracking
SBD to GSatTrack
To setup SBD position transmissions to GSatTrack, simply configure the tracking panel as shown below.
Click image to see full size
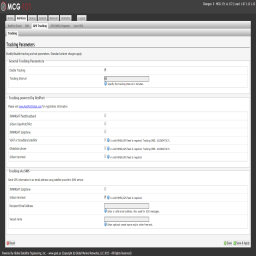
SMS to GSatTrack
To setup SMS position transmissions to GSatTrack, simply configure the tracking panel as shown below.
Click image to see full size

SMS to Email
To setup SMS position transmissions to an individual email address, simply configure the tracking panel as shown below.
Click image to see full size
Firewall Settings
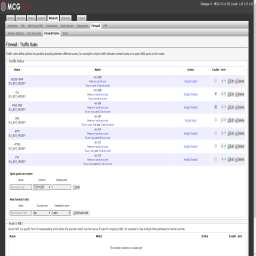
Disabling Built In Firewall
Network>Firewall>Firewall Rules - The firewall on the aurora is setup to block all traffic to the internet except for XGate and XWeb, so it must be disabled if you want unrestricted access to the internet. Check the rules named "ALL" and "DNS" (they are unchecked by default) and click "Save and Apply". This will enable all traffic to pass through the firewall.
Click image to see full size
Iridium Auto Connect

Setup Iridium To Connect On Any Traffic
Follow the instructions above to disable the built in firewall, then proceed with the following steps
Network>PPP>Settings>PPP - Enable PPP to monitor traffic and connect on demand by enabling the "on demand" feature. PPP will connect as soon as the unit boots, and then it will disconnect if there is no traffic for 60 seconds (configurable). It will reconnect when it sees traffic.
Click image to see full size
GSM
Setting up GSM connectivity
If you connect an approved GSM USB dongle, you can setup your MCG-101 to connect via GSM and provide internet via WiFi and Ethernet. You have to manually switch your MCG-101 between Iridium mode and GSM mode
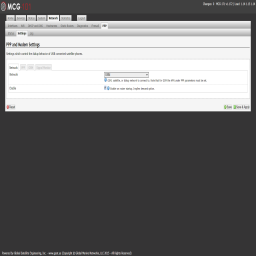
Step 1
Network>PPP>Settings>Network
Network: Select "GSM"
Enable: Select "Enable on router startup"
Click "Save and Apply"
Click image to see full size
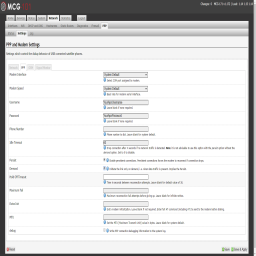
Step 2
Network>PPP>Settings>PPP
Username: Enter your APN username or leave blank for no username
Password: Enter your APN password or leave blank for no password
Persist: Select "Enable persistent connections"
(optional) Demand: Select "Initiate the link only on demand". This is not recommended for GSM connectivity
Click "Save and Apply"
Click image to see full size
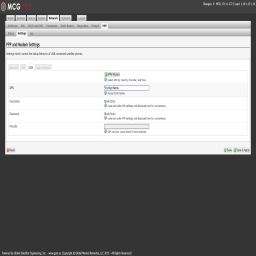
Step 3
Network>PPP>Settings>GSM
APN: Enter your APN
Click "Save and Apply"
Click image to see full size
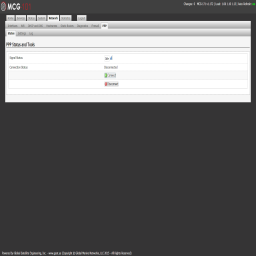
Step 4
Network>PPP>Status
Connection Status: Click "Connect" to initiate connection
Click image to see full size
AT Command Interface to Iridium
How to communicate directly with the Iridium modem
If you have an application where you would like to send SBD, SMS, or other AT commands directly on the Iridium modem for your application, you can do so by connecting to the Ethernet port or via WiFi and creating a TCP socket to the unit which will be translated to the serial port of the unit. You cannot use this interface for dialup data because there is no flow control for packets from your application to the Iridium modem on this port. RUDICS applications could possibly operate over this port on a case by case basis because of the lack of flow control.
Step 1
telnet 192.168.10.1 5454
Step 2
send “at+login=webxaccess” to login
Step 3
send “at+pass” to switch to pass thru mode
Now you enter commands like “AT+SBDWB=[bytes]” which are sent directly to the modem. From here, you can follow the attached SBD guide starting at section 6.1.2 on how to load an SBD message into the queue and transmit.
Specifications
System Capabilities
System capabilities include all major PBX features, including:
Call Features
- Authentication
- AutomatedAttendant
- Blacklists
- Blind Transfer
- Call Detail Records
- Call Forward on Busy
- Call Forward on No Answer
- Call Forward Variable
- Call Monitoring
- Call Parking
- Call Queuing
- Call Retrieval
- Call Routing (DID & ANI)
- Call Snooping
- Call Transfer
- Call Waiting
- Conference Bridging
- Database Store/Retrieve
- Database Integration
- Dial by Name
- Direct Inward System Access
- Distinctive Ring
- Do Not Disturb
- Flexible Extension Logic
- Interactive Directory Listing
- Local and Remote Call Agents
- Macros
- Predictive Dialer
- Privacy
- Overhead Paging
- Protocol Conversion
- Remote Call Pickup
- Remote Office Support
- Roaming Extensions
- Supervised Transfer
- Talk Detection
- Three-way Calling
- Transcoding
- Graphical Call Manager
- Predictive Dialer
- Voice Mail
- Visual Indicator for Message Waiting
- Stutter Dial tone for Message Waiting
- Voice mail to email
- Voice mail Groups
- Web Voice mail Interface
Codecs
- ADPCM
- G711
- G722
- G7231
- G726
- G729
- GSM
- iLBC
- Linear
- LPC-10
- Speex
Protocols
- IAX
- SIP
- SCCP
- Traditional Telephony
- Interoperability
- FXS
- MF and DTMF support
Size & Weight
| External Dimensions: | 1.18" x 4.25" x 6.1" (30mm x 108mm x 155mm) |
| Weight: | 2 lbs (0.907185 kg) |
Performance
| DC Input Voltage: | 12V @ 2A DC - Center Positive |
| Power requirements: | 18 watts |
| Power Adapter (Included): | 110-220V 50/60hz AC to 1.5A @ 12V DC |
| 12V DC Amperage Test: Power on and satellite idle: | Peak: .45A/5.4W Average: .26A/3.12W |
| 12V DC Amperage Test: Power on to fully active bidirectional call: | Peak: .95A/11.4W Average: .74A/8.88W |
| Inrush Current: | High resolution peak of ~11A for half a millisecond and tapers off |
| Iridium Impedance | 50 Ohm |
| GPS Impedance | 50 Ohm |
| Wi-Fi Impedance | 50 Ohm |
Environmental Requirements
| Operating temperature: | 32 to 113ºF (0 to 45ºC) |
| Storage temperature: | -13 to 158ºF (-25 to 70ºC) |
| Operating relative humidity: | 10 to 85% (noncondensing) |
| Operating altitude: | up to 10,000 ft (3000m) |
| Storage altitude: | up to 15,000 ft (4500m) |
ESD Standards
| Iridium 9523: | Human Body Model 2kV and Machine Model 200V ESD protection. |
| GPS port: | ESD sensitive port only when antenna not connected. |
| 2x WiFi ports: | ESD sensitive port only when antenna not connected. |
| Ethernet, USB, FXS: | TBD |

